
“It is a huge danger to pretend that awful things do not happen.
But you need enough hope to keep going. I am trying to make hope.
Flowers grow out of darkness.”
—Attributed to Corita Kent
In February, there came a point where I’d had enough tiresome weather, inside and out. If the cloud cover wasn’t gonna lift, I’d cut a keyhole in it. I needed to let in a little glimpse of blue skies. Sunlight. The conditions that lead to blooms.
How?

Sometimes crafting something with my hands for others creates a bit of relief. Thinking about what a specific person may enjoy can come with a side effect of delight. And focusing on the tactile experience of shaping a gift, of bringing it into material reality, can cause a little shift in the atmosphere.
So in February’s cozy Creativity Café gathering, I shared with my pals that I’d be using our individual crafting time to make them a little something. I noted their favorite colors and themes.
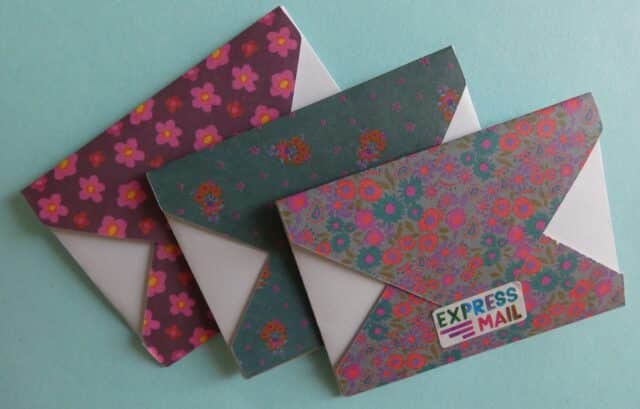
I decided to make them colorful seed packet envelopes of tiny goodies. This would give me a chance to sow some encouraging words and connection into my friends’ creative lives in a whimsical way. (I do not know where I got the idea to design the envelope to look like a seed packet. It is possible I saw this somewhere, but I have no specific memories of that and have since scoured my Pinterest boards and Substack feed to provide credit, if it was due, to no avail.)

Could you use a little break for a hands-on activity? Do you have a pal who might enjoy receiving a handmade gift in their mailbox?
After reading this, you’ll know how I made these “seed packet” envelopes of goodies. (Spoiler, there’s no literal seeds in them.) And good news, these can be customized to be as simple or intricate as you like. I’m usually one for quick projects. But I ended up taking my time with these, enjoying the indulgence of following ideas as they slowly emerged throughout the process.
I have to say, pulling out scratch and sniff stickers and quietly cutting out tiny paper seeds felt a bit wild and rebellious. I was insisting on using my time and focus for adding flourishes to friends’ gifts instead of taking in the gray weather, processing the news, or solving heavy dilemmas.
I started with a simple piece of cardstock. I had this natural brown color on hand, but use any color you enjoy. I found it helpful to work with something thicker than copier paper, but not so thick as cardboard. You don’t have to buy something new for this. Perhaps you have a cereal or cracker box to cut up and use.
How big should the total size of the cardstock paper be before folding? You can eyeball it, but I went for approximately 11 inches tall and 3.5 inches wide.
First, fold down the top two inches to create the little closure flap.

Great! Now, take that remaining big section of paper below the flap and fold it in half, so your paper has three sections.

While folded, flip it over to decorate. (Yay!) I used a black Sharpie to outline the banner shape at the top, and a white Posca pen to fill it in. Then I wrote in the lettering. (You may want to first write the words in pencil and then go back over them with a Sharpie if, like me, you want a second and third chance to figure out your letters’ spacing.)

For the flowers, I cut up magazine pages and glued them on with a glue stick. But you could draw or paint them on or use your own lovely flower photography, if you like.
I will say that when I first glued the left and right sides of the envelope edges together I discovered that neither a glue stick nor hot glue was going to hold (uh-oh). So I recommend something with a stronger bond for that part. I used Nori glue and then sat a heavy book on top of it until it dried.

While waiting, I drew some seed outlines over the top of magazine text. (You could use junk mail if you don’t have magazines handy.) With some, I tried to find a word that might have fun significance for the person I was sending them to, which can make for a fun side quest. Then I cut them out and glued them onto the flower photos.


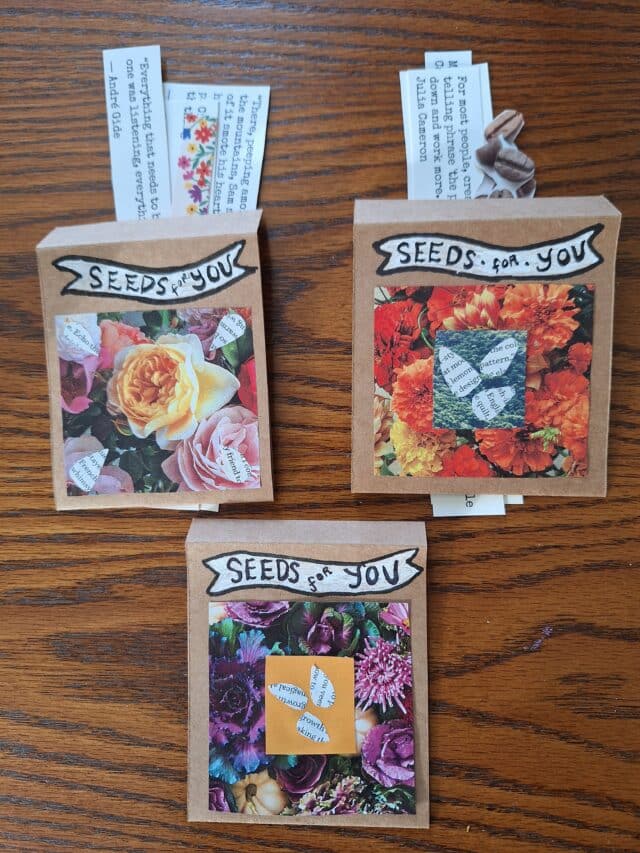
Next, I got to choose what to tuck inside! I knew I wanted to include encouraging quotes for my friends about the creative journey. I gathered a list of some of my favorites and numbered them 1-10 so my friends could choose who got what. But to make this process a little more playful and colorful, I decided to number my bouquet of tulips, which I had brought to the café, and have them pick a numbered flower.


(No one else picked the number for this quote, so I got to keep it. Happily, it now lives on my refrigerator as well as at the top of this post.)
I had a load of fun brainstorming which doodads to include. Some people may have got little cut outs of pretty or yummy items I found on the magazine pages, everyone got stickers. And. . .

I penned a small, and I mean small, note to each person. I used these cuties, the Little Envelope Letters, from Natural Life. (They’re about two inches wide.)
Some other tiny treasures you might consider offering: a button, like this charming Sadbook one I recently got, a mini bookmark, a little sketch or collage, or a bookplate for your pal. The two floral stickers shown here are from the Elle Nicole shop. (The store owner, by the same name, creates her own designs.)

After you’ve folded up your items and tucked them into the packet, you may want to use a bit of strong clear packing tape (with cute washi tape or stickers over it?) to seal the closure flap down.
At this point, I recommend wrapping your whole seed packet gift in a piece or two of tissue paper and putting that into a bigger envelope that you will address. You may want to check with the post office to see how many stamps it needs as it may be thicker and heavier than a typical card.
Your Turn
If you try this, or a different version of it, feel free to let me know how it went in the comments. I’m wondering:
What would you like to include inside a packet?
What would you wish to receive?
Whether you try this craft or just find yourself wanting to send a note or postcard in the mail to a friend, I’d love to hear about it. These days, any kind of positive connection between folks can be its own flower, especially on a gray day.
Post and photos by Bethany Rohde.

- Sending You Seeds - May 20, 2026
- New Year Reset: Giving My Phone a Nap - January 14, 2026
- A Creativity Recess Kit - August 20, 2025
Sandra fox Murphy says
Love it, Bethany! Such fun and I’ve received such a packet. Those hydrangea flower “seeds” look like coffee beans! What would I want to receive? …. coffee beans!!
Bethany says
Thank you for this, Sandra! And yes, coffee is always the right answer. 😉
Dheepa Maturi says
This is such a beautiful post, Bethany! Full of light and creativity and, of course, joy. What wonderful ideas to make art and build community. Thank you so much for this!
Bethany says
Dheepa, thank you for spending time with my ideas and for sharing your uplifting response!
L.L. Barkat says
So much to love here…
First, the opening quote: “It is a huge danger to pretend that awful things do not happen.
But you need enough hope to keep going. I am trying to make hope.
Flowers grow out of darkness.” Wow. Yes.
The keyhole in the gorgeous sky. What a photo!!!
The whole process. What lovely fun. And all the seed packets. (I see mine! 🙂 )
This cheers my day, Bethany. Thank you for sharing it with us.
Bethany says
L.L., thank you for sharing your response!
I found that keyhole in the clouds on a walk I *almost* didn’t take. I was surprised when I came around a corner to the big reveal. Had to take a pic.
Delighted to share about this process and to send. you. seeds!